Kachinas’ goalie parents and coaches, this is Goaltending Director Hiroki Wakabayashi.


Part 1:
We have another special article by Coach Jen Taylor about our favorite topic,,, goalie gears!
Coach Jen’s “The Book of Leg Pads”
I hope that everyone one is having a wonderful holiday break! This month’s goalie gear article is on Leg Pads!
Goalie pads are one of my favorite pieces of gear to talk about because there are so many features that can change which affect how the gear and athlete perform. This month I’ll review the basics about goalie leg pads, but also dive into some details that I’ve learned over the years playing and ordering gear that most goalies are unaware of. Goalie pads are pieces of equipment that continue to evolve, and it is always interesting to see what innovations make a lasting impact on the design and playability of the pad.
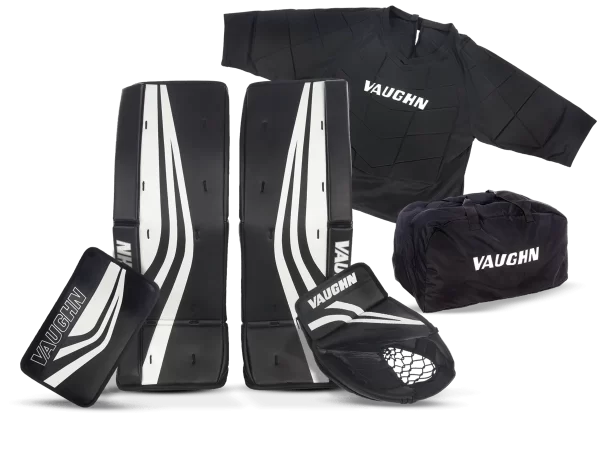
- Quick Change Pads
For our development girls trying out goalie for the first time, the quick change pads are a great place to start.
The Kachinas have two kinds of quick change sets –the black Vaughn quick change set and the white total hockey quick change set. If your daughter is younger, shorter, or learning how to skate, I recommend her trying the smaller and thinner white total hockey set. If your daughter is taller and has learned to skate, I recommend starting with the black Vaughn set.
The purpose of these sets is to allow girls the opportunity to quickly and comfortably try goalie without all of the overwhelm that can come from using goalie pads the first time.
These pads are designed to go over regular player shin guards and provide extra blocking area and performance of a goalie pad.
TO PUT THE QUICK CHANGE PADS ON: THE LONGITUDINAL OUTSIDE ROLL GOES ON THE OUTSIDE, THERE WILL BE A KNEE CRADLE OR FLAPS THAT THE KNEE WILL LAND ON. THIS GOES ON THE INSIDE OF THE LEG.
- Straps
I recommend fastening the pads with the bottom straps first and then working your way up the leg.
If this is your daughter’s first time wearing goalie pads, I recommend arriving early to the rink or having her try the pads on at home before her practice, so she has time to adjust the straps off the ice. This helps make good use of ice time for everyone. A full set of quick change goalie gear (pads, chest pad, and gloves) can be put on (correctly) in under 2 minutes. That’s it!
- Brands
For goalies that have decided to commit to the position, I recommend learning about gear and how it affects your play. In some ways, goalie leg pads have dramatically changed over the years, but in other ways, you will see companies that find a concept that “works” and that innovation lasts multiple generations of that product line.
Bauer, Brian’s, and Warrior have been brands that have brought a lot of innovation to their year to year line, whereas CCM/TRUE premier and eflex lines and Vaughn tend to be more tried and true with minor changes between models on a year to year basis. Sometimes the only major change between year to year models is the graphic of the pad. Manufacturers will also put the graphics of another make, model, or brand for a pro goalie, so try not to let the graphic influence your decision on the gear you wear. It is best to use the gear that works best for you, and not how it looks or who is wearing it.
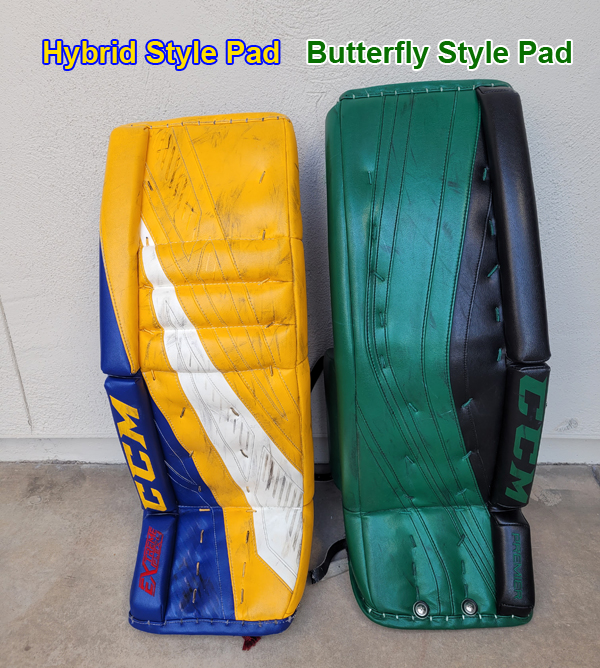
- Styles of the Leg Pads
Right now there are two main styles of leg pad, with the first being the butterfly style pad and the second being a hybrid style pad. In general, butterfly style pads are made to maximize blocking area and puck rebounds whereas hybrid style pads are made for increased mobility and controlling in tight rebounds. The shape, stiffness, “breaks” and internal foams contribute to the style of pad.
Higher density foams will transfer energy (from the puck or your body) differently than softer lower density foams, and this will dramatically affect the feel and speed of the pad on the ice. Finding a pad that fits your game can give you a competitive advantage over the course of a season, so this is an important thing to consider when selecting a pad. The best way to pick your style of pad out is to experience it first hand during a goalie demo day, swapping gear at a summer camp, or practicing with a teammates set.
- Proper Sizing
Next, it is important to have the correct size pad. Using pads that are too small or too big will increase the risk of injury and diminish the playability of the gear.
In general there are youth, jr., intermediate, and senior categories of pads. Within the different categories, you will find different sizes. The sizes are generally marked in inches, and are based on a series of measurements such as a floor to knee or ankle to knee measurement. THESE MEASUREMENTS CAN VARY BRAND TO BRAND.
If you are buying new pads, it is best to try them on and be fit by a goalie sales rep. Make sure that the knee sits in the middle of the knee cradle when standing and in the butterfly. When trying pads on for size, be sure to wear your pants, and skates.
One thing to keep in mind is that girls generally grow at a different rate than boys, which means that a 13 year old girl may need a larger set of pads than a 13 year old boy. Proportionally, women tend to have longer leg length to torso ratio then men, so it is important to have the correct measurements taken for gear and not assume sizes that will fit your frame.
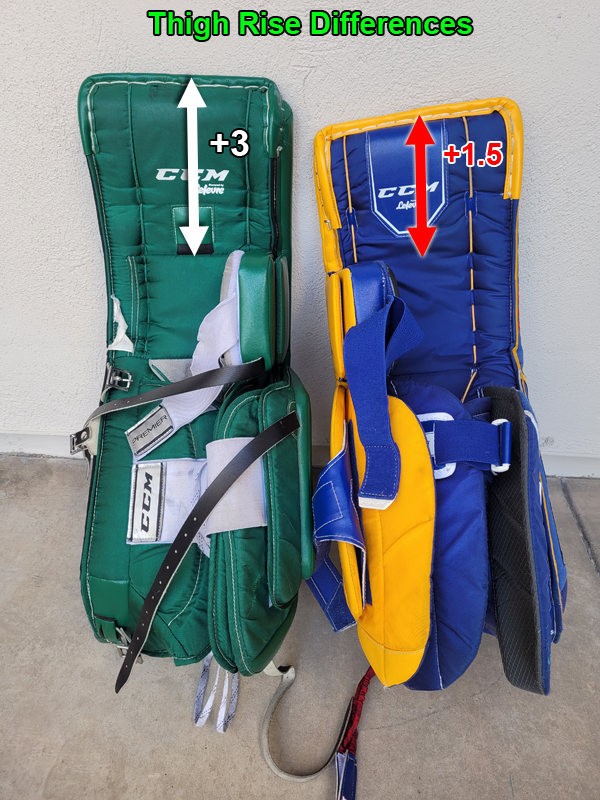
- “Plus” Sizing (Thigh Rise)
With that being said, the “plus” sizing means added length to the top part of the pad above the knee area. In general, most pads have +1 or +2 inch sizing now to help cover the five holes in the butterfly. I have personally used +0,+1.5,,+2, and +3 and the extra size definitely affects the pad.
The extra length can be forgiving when dropping into the butterfly or RVH (a +3 size adds 6 inches of coverage) but a huge hindrance to mobility and goalie skating. The added length at the top of the pad will cause increased strain on the hips, adductors, and knees from having a wider stance, leading to strains and sprains over the course of a season.
For younger goalies, 0-1″ is appropriate (sometimes the number is added for marketing purposes) and for goalies that have developed their skating 1″ to 2″ on the thigh rise could be beneficial to have for added blocking area.
In the NHL, the thigh rise is currently based on the goalie’s individual height and length of the leg, in an effort to outlaw oversized gear. If you want to try a +3 thigh rise, we still have the pads in my closet 🙂
- Toe Ties and Strapping
Toe ties and strapping are current areas of innovation. When I was growing up, we used laces and leather straps with buckles to fasten gear. A few years ago, velcro became popular in almost all brands. Velcro is lighter and quicker to put on but can wear out after a season or two.
Strapping is largely personal preference, and the best way to determine the strapping of the pad is to put on your skates and pants and try the pads on off the ice. If the pads are too tight, they will under rotate in the butterfly, but if they are too loose, they will over rotate and face towards the ceiling when in the butterfly. The most important area to adjust are the toe ties, the calf straps and the knee cradle strap.
If a strap is not working well, it may affect a different area of your body. This will largely depend on the brand and style of pad, and you should not feel any painful tension in your ankle, knee, and hip if the strapping is correct.
- Accessories
There are some great accessories that have come on the market. I am a fan of the prolaces bungee toe ties because these work well to keep the pad attached to the skate while taking stress off the toes, ankle, and knee.
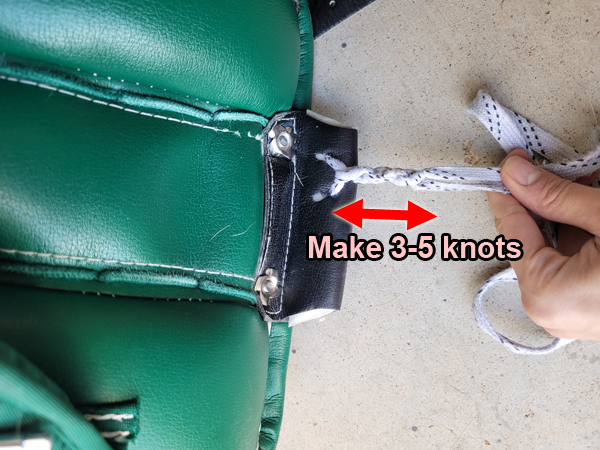
[Toe Lace]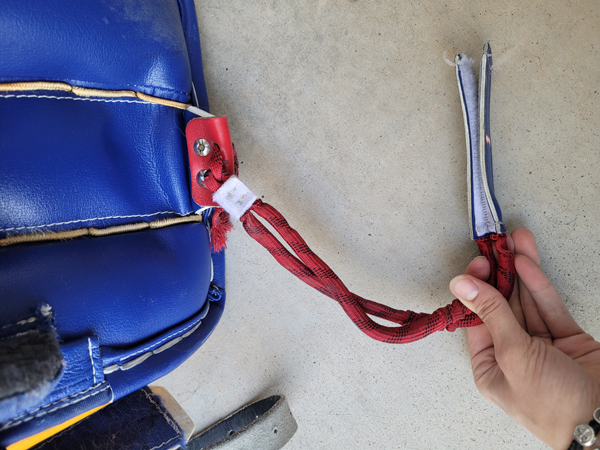
[Bungee Tie]Another accessory that can help keep stress off the pelvis, hips, and knee is an additional knee stack or two in the knee landing. It is important to have the knee sit higher in the butterfly than the calf and the ankle. When in a butterfly, the skates and blades should be close to the ice and not several inches in the air. If your pad has a knee stack and a calf pillow, the knee and the leg are at the same level, which puts stress on the hip and slows you down from recovering. You can fix this by purchasing an additional pillow to put into the knee landing area or removing the calf pillow (not the calf landing).
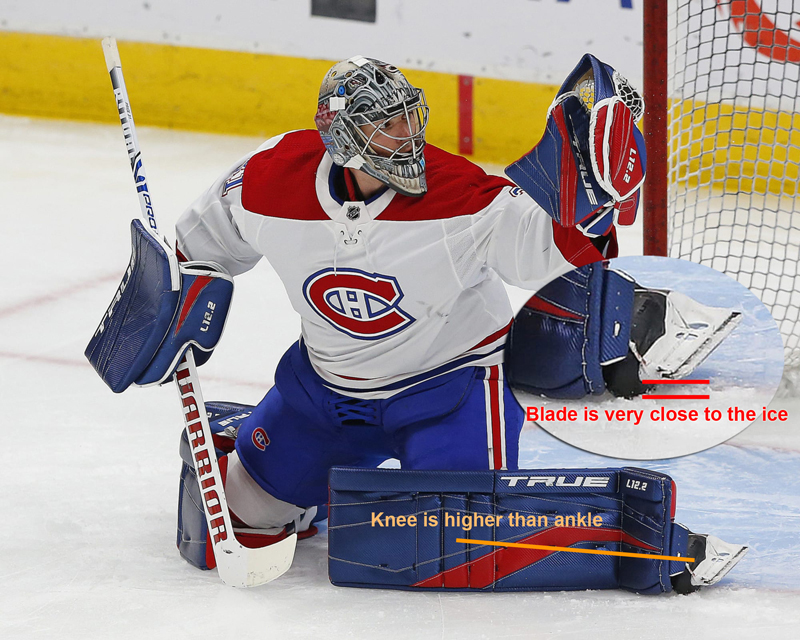
[Proper alignment of Knee, Ankle and Skate Blade]For added style points, Padskinz are a fun way to add color to a stock set or cover mismatching colors from a used set of pads. Sharpies do not work well to change color nor does paint or tape.
- Maintenance
Goalie pads are not cheap, so make sure you take good care of them by allowing them to dry after use. Pads tend to keep their shape better over time by storing them upside down. If your pad is starting to develop wear spots in the jenpro (leather part) you can use super glue to cover the damaged area and prevent it from getting worse. This will also work on the nylon areas too. You can also safely remove puck marks and dirt with a Mr. Clean magic eraser. The eraser does not damage the materials, but it might remove a printed sticker.
Pro tip:
if you resell your pads on a site like sideline swap, clean your pads first. Your gear will sell easier and you’ll probably get a few extra bucks for it too.
Naturopathic Doctor
Well, it was a great read. I plan to send the Part 2 of the Newsletter next week, talking about some important stuff so stay tuned.
Feel free to contact me if you have any questions.